Introduction
As we have shown at ELC2017, we integrated an easy way for warp_0x01 users to upgrade the OS installed in their boards.
Thanks to the nice features provided by SWUpdate and the integration work that we have done in our meta-warpx Yocto layer we are now able to provide straightforward complete OS upgrades in a single file through a simple web interface.
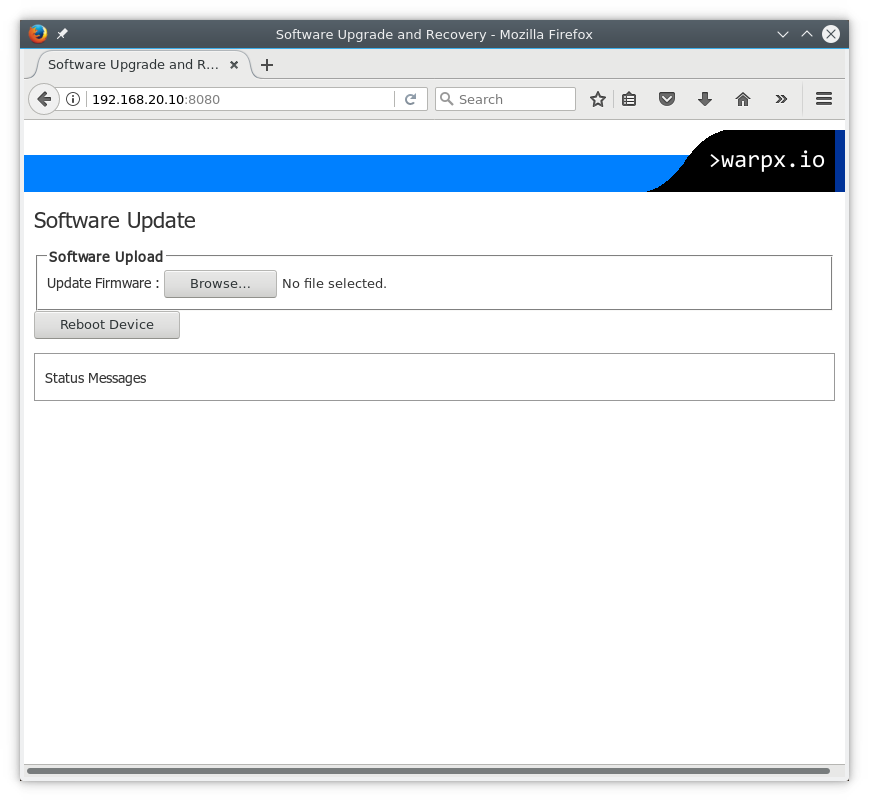
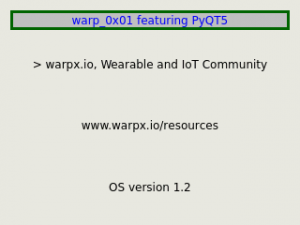
>warpx.io SWUpdate web interface
WARNING: Keep in mind the procedure wipes all the data in the storage of the warp_0x01 and flashes the latest version of the Linux distribution we built using Yocto.
Prerequisites
SWUpdate operates in the following way: a client running on the target (the warp_0x01) obtains an .swu file from the host (your PC) which is then unpacked and interpreted to flash the new OS in the storage (the eMMC).
The installation of the SWUpdate client is done by doing a raw copy of our all-in-one SWUpdate standalone OS image to the warp_0x01 storage using the U-Boot USB Mass Storage feature to export the eMMC as a USB storage. This operation thus requires:
- a working U-Boot in the warp_0x01 board with serial console access. If you own an interposer board and haven’t intentionally hacked up U-Boot in your board this requirement is already satisfied
- a tool for raw copy (dd in Linux and Mac OS, USB Image Tool or Win32 Disk Imager in Windows)
The transfer of the file to the target is done via a web interface exposed by SWUpdate on a fixed IP of an USB Gadget Ethernet interface. To reach the fixed IP of the target, the host computer should support RNDIS USB Ethernet: most Linux distributions include the driver out of the box, while Windows and Mac OS might require manual installation of appropriate driver, depending on the version.
We’ll not enter in the details of using raw copy tools other than dd or how to install RNDIS USB Ethernet drivers, as there are plenty of howtos available on the internet that cover those topics.
SWUpdate client installation
As anticipated, the first step to update the board is to install the SWUpdate client with the SWUpdate standalone OS image we provide. Download the file swupdate-standalone-os.img and follow instructions below.
U-Boot USB Mass Storage setup
To expose warp_0x01 eMMC storage to the host as a USB Mass Storage:
- open the serial console on the host computer
- power up the warp_0x01
- interrupt U-Boot autoboot countdown on the serial console
- export the eMMC to the host with the following command
=> ums 0 mmc 0
UMS: LUN 0, dev 0, hwpart 0, sector 0x0, count 0x748000
\
- a 4GB storage device should appear on the host
Flash of the SWUpdate standalone OS image
On the host identify the warp_0x01 4GB storage device and flash the swupdate-standalone-os.img. As an example procedure on Linux should be as follows:
# dd if=swupdate-standalone-os.img of=/dev/disk/by-id/usb-Linux_UMS_disk_0-0\:0 conv=fsync
51824+1 records in
51824+1 records out
26534293 bytes (27 MB, 25 MiB) copied, 26.748 s, 992 kB/s
Now the SWUpdate standalone OS image is flashed and ready to be booted.
Boot SWUpdate standalone OS image
Return to U-Boot and interrupt the USB Mass Storage mode with Ctrl+C.
At the U-Boot prompt enter the following commands to boot the SWUpdate standalone OS image:
=> mmc read ${initrd_addr} 0x2000 0xAA80

MMC read: dev # 0, block # 8192, count 43648 ... 43648 blocks read: OK
=> setenv initrd_high ${initrd_addr}
=> bootm ${initrd_addr}
## Booting kernel from Legacy Image at 83800000 ...
   Image Name:   Multi-file image
   Image Type:   ARM Linux Multi-File Image (gzip compressed)
   Data Size:    22339925 Bytes = 21.3 MiB
   Load Address: 80008000
   Entry Point:  80008000
   Contents:
      Image 0: 5898480 Bytes = 5.6 MiB
      Image 1: 16408006 Bytes = 15.6 MiB
      Image 2: 33421 Bytes = 32.6 KiB
   Verifying Checksum ... OK
## Loading init Ramdisk from multi component Legacy Image at 83800000 ...
## Flattened Device Tree from multi component Image at 83800000
   Booting using the fdt at 0x84d45f08
   Uncompressing Multi-File Image ... OK
   Loading Ramdisk to 8285a000, end 837ffdc6 ... OK
   Using Device Tree in place at 84d45f08, end 84d51194

Starting kernel ...

Booting Linux on physical CPU 0x0
Linux version 4.1.15-1.0.0_ga+g1eb0314 (yocto@ubuntu-yocto) (gcc version 5.3.0 (GCC) ) #1 SMP PREEMPT
 Wed Mar 15 17:10:43 CET 2017
...
The SWUpdate standalone OS will now start and be ready in a bunch of seconds.
Firmware update file transfer and deploy
Now that the SWUpdate client is up and running on the warp_0x01 we need to setup the host to connect and reach the webpage to upload the .swu firmware update file.
Setup the RNDIS USB Ethernet interface
As the warp_0x01 USB Ethernet interface is already setup with the fixed IP 192.168.20.10 (netmask 255.255.255.0) all that is needed is to set a fixed IP on the USB Ethernet device on the host on the same network. This is a Linux example to do so:
# ip link set dev usb0 up
# ip addr add 192.168.20.11/24 dev usb0
# ping -c 1 192.168.20.10
PING 192.168.20.10 (192.168.20.10) 56(84) bytes of data.
64 bytes from 192.168.20.10: icmp_seq=1 ttl=64 time=0.466 ms

--- 192.168.20.10 ping statistics ---
1 packets transmitted, 1 received, 0% packet loss, time 0ms
rtt min/avg/max/mdev = 0.466/0.466/0.466/0.000 ms
Upload firmware update file
Now that everything is set up, updating the OS on the warp_0x01 should be straightforward: opening a browser on the URL http://192.168.20.10:8080/ will bring you to the SWUpdate web interface.
Download the most recent .swu firmware update file provided on the >warpx.io resources download area and upload it to the warp_0x01 via the web interface. Here’s the quick link to warpx_1.1.0.swu shown in action below.
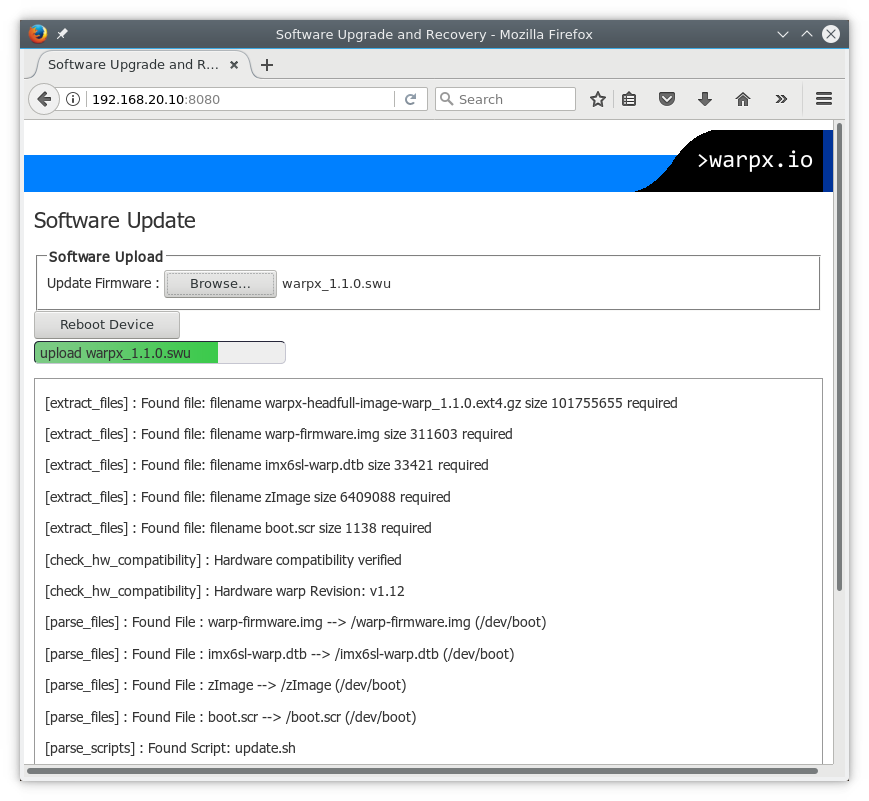
>warpx.io SWUpdate web interface showing progress of the OS upgrade
When the web interface reports “SWUPDATE successful !” in the Status Messages of the web interface the OS is successfully upgraded, and you can boot it just by pressing the “Reboot Device” button!
Whenever you want to upgrade to a newer version, you just need to go back to the “Boot SWUpdate standalone OS image” section and follow the instruction from there on!
Conclusions
We hope that the work we’ve done will help you with the task of keeping your warp_0x01 up-to-date.
We plan to make some improvements in the future to upgrade the installed version of U-Boot too and allow to easily switch from the regular OS to the SWUpdate standalone OS without having to enter commands to the U-Boot prompt. So if you have any feedback or you need a helping hand, please reach out to us in the mailing list!